Today I'm going to share my first tutorial ever! Confused? You should be!
Ages ago, on my family blog, I posted a photo of my boys with some creatures I made for them. Later my sister-in-law (who has three boys!) requested that I share how to make them. I created this little tutorial just for her. Now I am sharing it here -- in all its photos-taken-in-the-dark-basement glory!
These little guys are super easy to make, and so much fun! They go together very quickly, and if they aren't perfect -- well, it only adds to their charm! They are made from small bits of fleece, which is SUPER friendly to work with.
I must say, I love the yellow fellow with the beaver tail!
STEP TWO: Cut out the pattern of his main body (arms and tail will come later), and place him on a double layer of the fleece or felt of your choice. Cut around him with about a 1/4" seam allowance. (You will see how this is certainly no exact science!)
STEP FOUR: Lay a white piece of fleece cut in the same shape on top, layering it just slightly above the black mouth shape (so the black won't show at the top) and stitch on teeth shapes. After sewing, cut away the excess.
STEP FIVE: Sew hand shapes on a double layer of fleece, then turn and stuff. I sew first and cut later!
STEP SIX: Sew around all edges of your creature, sticking his arms in the side seams as shown and leaving just the bottom open.
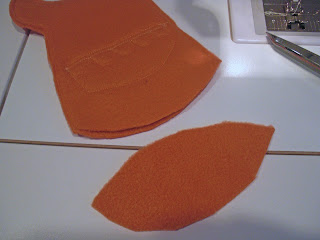
STEP SEVEN: Cut a wedge-type shape thingy that more or less matches the curve of the bottom of the creature and set it aside.
STEP EIGHT: Create a tail. I wanted my creature to have a stripey tail, so I sewed short strips of fleece together to create the stripes.
Fold it right sides together and sew around, creating a curve at the end. Turn and stuff.
STEP NINE: Right sides together, sew the back to one side of the bottom wedge thingy, with the tail inside and the tail's seam allowance sticking out.
STEP TEN: Stuff him and sew the opening shut by hand.
STEP ELEVEN: For the eyes, sew a small black circle onto a larger one -- my small circle was about 3/4" diameter, and larger one was about 4" or 5". Take a running stitch (by hand) around the edge.
With a ball of stuffing inside, pull the thread taut and tie a firm knot. Leave the needle and thread attached for now.
Decide where his eyes will go. I liked them at the end of the horns, but Buzz thought it was completely unacceptable...
 ...so this placement won!
Sew the eyes on and knot tightly.

TA-DA! Isn't he jolly??


So cute!!Yay, you're awesome.
ReplyDeleteYou always have such wonderful directions. The photos are so detailed so you can actually see what you are doing. Keep up the good work! How about something for the girls out here?
ReplyDeleteThose little guys are just too cute!
ReplyDeleteI'm in love with your monsters!!! Your photos look better than any of mine!!!
ReplyDeleteI LOVE the monsters!!! I bet the more wacky the color combination, the more fun they are for the kids :)
ReplyDeleteCrazy Cute!!!!!
ReplyDeletethese are killer cute!! love the beaver tailed one eyed goofy monster
ReplyDeleteHi there, I loved your tutorial and made one myself for a birthday party! Thanks, so cute!!
ReplyDeletewww.herhobby.blogspot.com
Thank you so much for this great tutorial! I'm definitely a beginner when it comes to sewing, so your steps in such detail are a HUGE help! Can't wait to make these for my boys as stocking stuffers!
ReplyDeleteThese are perfect for our Homeschool Mascots :) Thank you so much!!!!
ReplyDeleteI just found this on Pinterest and these are absolutely adorable!! Thanks for sharing!
ReplyDeleteI love these cute silly monsters! Love everything about them, especially how you made the eyes! Love the tutorial, thank you so much for sharing! I featured this post here: http://www.plushiepatterns.com/fleece-creatures-plushie-pattern-by-obsessively-stitching/
ReplyDelete