(find Part One of this tutorial HERE!)The method for binding the raw edges of your storage cube is basically the same as binding a quilt. I've actually tried a couple ways of binding these cubes, and this one seems to work the best.
 STEP ONE:
 Start with a SQUARE side up. Lay your binding along the edge of the square with the raw edges lined up. (I moved mine over so you could see how I layered it.)
 STEP TWO:
 Sew with 1/4" seam allowance, stopping 1/4" before the end of your cube. Backstitch. (Make sure all the excess fabric is out of the way so you don't end up sewing the bottom of your cube into the seam allowance!)
 STEP THREE:
 Rotate your cube one turn counter-clockwise. Pull the excess fabric up and out of the way. Fold your binding upwards so the raw edges of the binding create a straight line with the raw edges of your cube, as shown.
 STEP FOUR:
 You will now fold your binding down, once again lining up the raw edges with your square. (You can't see it yet, but this is creating a fancy-schmancy mitered corner!)
 STEP FIVE:
 Backstitch until you are 1/4" from the edge, then sew forward again 1/4" shy of the next corner. Repeat Steps Three and Four for this corner, then sew all the way to the final edge.

Your cube should look like this!
Now, repeat Steps One through Five on the other side!
 STEP SIX:
 Lay your cube so the binding is behind the raw edge of your cube, as shown. Fold the binding over the raw edge, encasing the raw edges inside. You will now finish attaching your binding!
 STEP SEVEN:
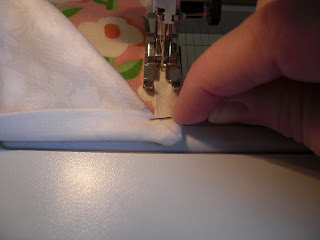
 Sew along the folded edge of your binding. Try to match the seam allowance inside, if possible. When you get to the corner, stop (once AGAIN!) 1/4" from the end.
 STEP EIGHT:
 Fold the bottom edge up, creating a pretty little mitered corner, as shown. I use a pin as a stiletto to guide that little fold into the machine. Once your needle pricks down into the edge of the corner, stop with the needle down and turn your cube. Then continue sewing to the next corner, mitering it the same way.
Repeat Steps Six through Eight for the other side!
 STEP NINE:
 The exciting part! Grab your stack o' inserts and start stuffing them into the "pockets!" If you find that it's too tight a squeeze to get them in there, just trim them down a little.

Your cube is taking shape!! All that's left is binding that top edge!
 STEP TEN:
 The top edge binding is a little bit tricky because your cube is now stiff, making it a little more fiddly to get through your machine. You are actually going to carefully pin the binding to the OUTSIDE edge of your cube, lining up all those raw edges, because you will be sewing it from the inside. On one of your foldy sides, leave your binding dangling in the middle, as shown. Leave a little excess hanging there! :o)
 STEP ELEVEN:
 Starting close to the corner of your "dangly ends" side, SEW! using a 1/4" seam allowance. Look how I had to put my cube around my sewing machine! Ha ha!
 STEP TWELVE:
 Gently pull your cube out flat in front of your machine. Stop near the corner once you get back to your "dangly side."
 STEP THIRTEEN:
 Overlap your two edges and trim so there is 1/2" overlap.
 STEP FOURTEEN:
 You will then pull the two ends away from the cube (it's handy that it folds here!) and face the ends right sides together. Sew them together with 1/4" seam allowance.

Press the seam allowance open with your fingernail, then re-fold your binding. You will then finish attaching the binding at your machine.
The final step is to pull the folded edge of your binding around the raw edges (like you did in Step Six), and finish attaching your binding.
 DONE!! Just a bit tricky here and there, but definitely doable -- and trust me, it gets easier as you go along! :o)
I love how they fold up --

-- so nice and flat! I've made about half a dozen of these already, and it gets easier and easier every time. They are addicting to make, and so cute!
You could adapt these instructions to make cubes of other sizes as well. I made this size first because it worked out economically with my plastic canvas, and because it is a perfect fit for eight
I-Spy Blocks -- which is what I made my
original storage cube for in the first place! :o)

 When I made my green army men freezer paper templates to go along with my Army Bunker Tent last week, I also made the boys some T-shirts. Classic! I love how they turned out!


