My Red isn't completely finished, but I do have patterns and tutorials for her dress and cape. Read on!
(Find instructions for Red's Grandma here, Wolfie here, and the Woodsman here!)
(Find instructions for Red's Grandma here, Wolfie here, and the Woodsman here!)

Create your basic person body as described in Step One here.

Attach Red's hair as described for Goldilocks, here. In this photo I wanted to show you the difference between the separated strands, left, and the regular yarn strands, right. I separated the strands after the hair was all attached and knotted. I ended up braiding her hair too, because I think it's cuter that way under her hood.
For Red's dress you will need:
(you can use this pattern for Goldilocks' dress too!)
~ scrap of fabric
~ ribbon for trim and ties (mine was 1/8" wide)
 STEP ONE: Cut out one dress pattern from your fabric scrap, aligning the pattern arrows on the fold. (Yes, my fabric is under there!) Cut the slit as shown; this will create the armholes.
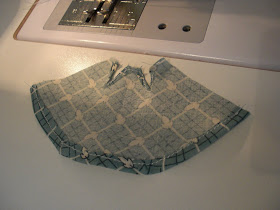
 STEP TWO: Finger press the armholes back just slightly, as shown.
 STEP THREE: Stitch your teeny little folds, down and then back up on each armhole. This is a little tricky, but it can be done.
 STEP FOUR: Turn the hem up approximately 1/4" and sew.
 STEP FIVE: Finger press the three top edges of the dress down a scant 1/4". Cut a piece of ribbon about 10" long and sew it across the entire top of the dress, centering it at the front, and stretching the armholes open just slightly.
 STEP SIX: Sew the center back seam from the hem up about halfway. You will finish sewing the back seam after you put the dress on Red. Before I sewed the back seam I added some ribbon trim over the top of the stitching on the hem for an extra detail.
For Red's cape you will need:
~ a scrap of red fabric
~ red ribbon for trim and ties (mine was 1/8" wide)
~ elastic thread (optional)
 STEP ONE: Cut out one cape pattern from red fabric, aligning the fold and the selvedge as indicated on the pattern.
 STEP TWO: Finger press the hem of the cape (curved edge) up a scant 1/4".
 STEP THREE: Stitch the hem, laying ribbon atop the raw edge as you sew. The ribbon will cover the raw edge of the hem, finishing the cape nicely on both sides of the cape.
 STEP FOUR: Cut your pattern piece on the dotted line as shown, leaving it attached about 1/2" in the center.
 Using a disappearing ink marker or chalk, mark the curve on the right side of your cape, flipping the pattern as needed to complete the entire curve. (You can decide which is the right side of your cape. I initially decided I wanted the ribbon trim on the inside, but after finishing the cape I wished it were on the outside.)
 STEP FIVE: With elastic thread in your bobbin, increase your stitch length to approximately 4, and sew along your line. Don't forget to backstitch on both sides. You will then repeat this step with another line just alongside the first.
If you are not using elastic thread, stitch with a basting stitch and gather it until it fits Red how you like, then stitch over your basting stitch with a regular stitch length to secure it.


She is so cute!! Lovin' the red cape and the little dress!!
ReplyDeleteI posted a link to your tutorial on Craft Gossip Sewing:
http://sewing.craftgossip.com/tutorial-little-red-riding-hood-finger-puppet/2009/10/06/
--Anne
Very cute! Are you doing a wolf too?
ReplyDeleteI've featured several of your items on childmade.com.