
 These little guys certainly aren't a new idea, but let me tell you -- they are ADDICTING to make! They whip up very quickly, and make great baby gifts. I find that even the bigger kids like to use them as ammunition in pillow fights!
 Here's what you'll need:
~Flannel scraps (use those ridiculously small pieces!)
~Ribbon scraps (I found a package of 6 coordinating 18" cuts at Target for $1!)
~scissors
~pattern for a 6-sided ball (use mine, or for a bigger one search "fabric ball pattern." It might be easier to start out with a bigger one!)
~pins
~sewing machine
~poly-fil
 (right click on the image and select "print picture")
 Step One: Cut out three pieces from one flannel,
 and three pieces from another. I "fussy cut" these ones so I could center the motifs I liked.
 Step Two: Lay them out, alternating the two fabrics.
 Step Three: Cut 9 pieces of ribbon about 3" in length. Fold each in half, and pin on every other ball piece -- one ribbon on the left, two ribbons on the right.
**As you are pinning, make sure that the folded side is more than 1/4" inside the opposite side you are pinning it on, to ensure it won't be caught in your stitching!**
(If you are using a larger ball pattern, you may want to use 15 ribbon pieces -- for each piece do two on the left, three on the right.)
 Here they are in the order you will sew them.
 Step Four: Take your #1 and #2 pieces and put them together face-to-face like you are shutting a book, with #2 on the top. Using your 1/4" foot, sew along the entire right side, backstitching at the beginning and end. I sew right over the pins; nothing bad has ever happened.
 Step Five: I like to sew this line again, just to the right of the first row of stitching, to be sure those little ribbons won't be popping out and creating choking hazards.
 Step Six: Open your first two and lay them in line to be sure you are going to sew #3 onto the correct side. Take #3 and fold it over #2, once again like you are shutting a book.
 This is just a little bit tricky, but don't be scared! Stretch #1 out of the way a little bit, and line up the corners of #2 and #3 as shown in the picture. (Just start with lining up that corner -- don't worry about the rest yet!)
 Step Seven: Sew as far as you can before the edges aren't lining up anymore, then stop with your needle down. Pull #3 over to line up the edges, and finish your stitching line. Don't forget to backstitch, and stitch that second line for safety!
 Now sew #4, #5 and #6 in the same way so you have two ball halves.
 Step Eight: Once again, shut these guys like a book. Starting at the top, pinch the ends together so all those seams line up right in the center (as shown in the photo).
 After those ends are together, gently pull the sides of the ball out until they line up flat against each other.
 Here, make sure the side that has TWO RIBBONS in it is in front! Starting just behind that endpoint where all the seams line up, backstitch and head all the way around to the other endpoint, lining up the fabric in front of the presser foot. Go slowly!
 Then continue around, just past the final ribbon, and backstitch. Don't sew it all the way shut or you won't be able to turn it! Then go back and sew your second line of safety stitching.
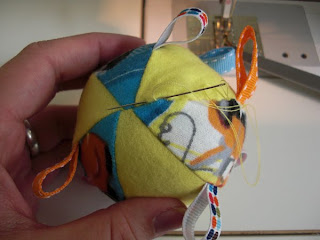
 Step Nine: Turn your ball right side out. Stick your pointer finger inside the opening, and pinch with your thumb on the outside, as shown in the photo.
 Still pinching, push your thumb back through the opening. Those little ribbons are quite handy for pulling this little guy right side out!
 Ta-Da! Empty ball!
 Step Ten: Stuff it!!
(The more lightly you stuff it, the easier it will be for little tiny hands to grab.)
 Step Eleven: Whipstitch the opening shut.
 You're done!
I like to pair these with a matching burp cloth for a baby gift!
16 comments:
love love love love love love love IT!!!!!!! ooooh can't wait to make this!!!
AHHHHHHHH!!!! I remember when you commented on a post of mine talking about the goof balls and I was so stoked to make one. then i realized I didn't know how to make a ball (i know that's lame) or what the shape of the pieces would be. i was sad oh so very sad, i even googled how to make a ball, but got sidetracked and gave up. then here you are with your fab tutorial and all. i love you!!!!!!
thanks, can't wait to make some. it's the perfect present!
MUST TRY!!! You have a great blog here!
This is so cute!! I bet these are very well received as baby gifts.
I posted a link to your tutorial on Craft Gossip Sewing:
http://sewing.craftgossip.com/tutorial-goofball-baby-toy/2009/09/05/
--Anne
So cute, my lil one would love one. Thanks fo the tut!
Very good tutorial! Great gift!
Ok, I love it, I made it for a gift, but why does mine look more like a donut than a ball?
Oh no, Tots and Tails!! The only thing I can think of is maybe the seam allowances went wonky? Or maybe it has something to do with the grain of the fabric? I don't know; I've not had that happen!
Anyone else having this problem?
I love the ball. I just made one and put it on my blog... thanks for such a great idea!
As soon as I saw this, I knew my daughter would enjoy one of these! I just made one tonight for a quick, fun project. Thanks!
guauu it´s great, really
Thanks for the tutorial. I made 2 of them today for Christmas presents for nephews. It's always nice when I can use my stash of fabric scraps to make something great!
I'm gonna have to try this with some of the organic fabric scraps I have! Love the idea!
Thank you for this tutorial. Im going to make one for my niece. :D. Im so excited to make one. This will be good for the baby nursery bedding that i am making. Thanks a lot
Thanks for this! I just made 4 for two boy's 1st birthdays. I think they'll really like them. My husband enjoyed juggling with them too.
Thank You so much!Kiss from Serbia.
Cale
Post a Comment