
My sister has four daughters, and when my daughter was born I inherited quite a pile of baby girl clothes. There was certainly much more than one little girl could ever use! Those same nieces are very much into their baby dolls, so what better way to utilize some of those baby clothes than to turn them into dolly clothes? As an added bonus, the dolls will never grow out of their clothes, PLUS it is so fun for the girls to put the same clothes on their dolls that they themselves used to wear!

Here I will show you a super simple way to make doll pajamas!
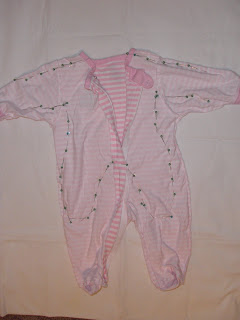
 STEP ONE: Supplies! You need a doll, baby pajamas, LOTS of pins, a good pair of scissors, and your sewing machine.
 STEP TWO: Turn the pajamas inside out and put it on your doll. (I am using my niece's doll she named "Crocodile." Such a pretty name!)
 STEP THREE: Pin around the doll. You will make a seam across the neckline and shoulders, and down the arms. This will make the neck small enough for the doll. Then pin from below the wrist all the way around the legs and back up to the other wrist.
 STEP FOUR: Carefully remove the pajamas, taking care not to lose or poke yourself with any pins. (This step also helps ensure your doll pajamas will go on and off the doll easily.)
 STEP FIVE: Sew exactly on the line where you pinned, taking out pins as you go. (Sorry, it's hard to see the stitching in this photo.)
 If your pajamas have a zipper, be sure to reinforce at the bottom of the zipper.
 STEP SIX: Cut around your stitching, leaving at least 1/4" seam allowance.
 STEP SEVEN: Turn the pajamas right side out, put them on the doll, and place a pin on the sleeve where you want the hem to be. Take off the pajamas, cut approximately 1/4" away from the pin, remove pin, and hem sleeves. (This is the hardest part of the whole project!)
 STEP EIGHT: Put your jammies on your doll!

Here I will show you a super simple way to make doll pajamas!
 STEP ONE: Supplies! You need a doll, baby pajamas, LOTS of pins, a good pair of scissors, and your sewing machine.
 STEP TWO: Turn the pajamas inside out and put it on your doll. (I am using my niece's doll she named "Crocodile." Such a pretty name!)
 STEP THREE: Pin around the doll. You will make a seam across the neckline and shoulders, and down the arms. This will make the neck small enough for the doll. Then pin from below the wrist all the way around the legs and back up to the other wrist.
 STEP FOUR: Carefully remove the pajamas, taking care not to lose or poke yourself with any pins. (This step also helps ensure your doll pajamas will go on and off the doll easily.)
 STEP FIVE: Sew exactly on the line where you pinned, taking out pins as you go. (Sorry, it's hard to see the stitching in this photo.)
 If your pajamas have a zipper, be sure to reinforce at the bottom of the zipper.
 STEP SIX: Cut around your stitching, leaving at least 1/4" seam allowance.
 STEP SEVEN: Turn the pajamas right side out, put them on the doll, and place a pin on the sleeve where you want the hem to be. Take off the pajamas, cut approximately 1/4" away from the pin, remove pin, and hem sleeves. (This is the hardest part of the whole project!)
 STEP EIGHT: Put your jammies on your doll!
193 comments:
Thanks for sharing! My daughter loves having "real baby" clothes for her dolls.
What a great way to reuse the baby clothes that I can't seem to let go of. I can't wait to try it! Thanks for the tutorial.
spectacular!
So stinkin' cute! But I only have a boy and he hates dolls :( Oh well, I can look!
wonderful dolls' clothes
Love this idea! My daughter just started putting diapers on her baby. I'm sure that dressing her baby will be next!
I love this idea so much!!! I posted a link to your tutorial on Craft Gossip Sewing:
http://sewing.craftgossip.com/tutorial-doll-jammies-from-babys-old-clothes/2009/06/02/
(Link will go live in 2 hours)
--Anne
This is such a great idea! I have linked to you at One Crafty Place!
Clever! Oh thank you for saving me vast sums of money buying teeny overpriced dolly clothes for the army of dolls we have at home! We have so many of them, and of course they are all different sizes so no clothes-sharing. What a very, very smart idea!
How clever!
This is positively genious!
This is such a cute and clever idea!
Thanks for sharing!This is a great idea!I can´t wait to try it!My daughter gonna be thrilled!!!!
Thanks to you we spent $4 at the Salvation Army and the better part of yesterday making clothes for my daughter's baby dolls. What an awesome, awesome idea and a totally user-friendly tutorial. Thank you so much for saving me from the pilled polyester outfits that the dolls came in.
To get around the tiny sleeve problem, sew most of the arm seam and leave the end open, then hem and finish sewing the seam, it may not look as good, but on small arms it is easier to do.
Christa in Australia
I never would have thought of just putting the doll inside the clothes to make your pattern. This one seems easy enough that maybe even I could do it. Thanks!
I love the picture of the dolly all pinned up inside the PJs.
Such a great simple idea! I have already made one, and probably more in the future. THanks! I found it easier to hem the sleeves by hand after a disaster at trying to do it on machine!
I love this idea! My girls will love having new clothes for their dolls, esp. clothes that they wore. How FUN! Thanks for sharing!
What a great idea. I will be trying this out.
great idea!
Thank you so much for this tutorial! I've found my daughter's old t-shirts (4T) are the perfect size for making nightgowns for my older daughter's 18 inch doll - no hemming required! The length of the shirt is the perfect length for the bottom of the nightgown, and the short sleeves are perfect for her long sleeves! Thank you so much!
I just wanted to let you know I linked to this tutorial at my blog. http://davimee.blogspot.com/2009/11/thinking-about-christmas.html Thanks again!
I have so many baby clothes that I was just about to give away, but this is a great idea! My daughter will love using the clothes she has seen her brother and sister wear.
Hi Care,
I just wanted to let you know I've again linked to your blog, and this time I posted a picture of my completed project. I am very new at sewing, so thank you so much for your tutorials! http://davimee.blogspot.com/2009/12/doll-clothes.html
Emily
thanks 4 doing this
Great tut! Thanks for sharing! I have a couple of shirts that I am making into doll clothes and you have given me some great ideas to make it easier! Thanks so much!
tooooooo cute!
Thanks for this! I made some for my daughter's favorite doll today. A mermaid! And linked to you on PrudentBaby.com
I'm so glad I found this! My son has "his" baby in one of his baby sister's outgrown nightgowns, but it's way too big. I had been planning on making something from scratch but have been putting it off as too much of a pain. This seems so much more reasonable. Thanks so much!
WOW!!! WOW!!! WOW!!! Off to the storage room!! i knew I kept those jammies for a reason!
I made sleepers very similar to this for my preemie. I added elastic to the waist making a casing by cutting the sleeper in half near the waist and sewing it back together using the seam as the casing.
If you are interested in my instructions email me at tamiejp@yahoo.com Put Preemie Sleeper in subject line.
Greatest idea ever!!! I have so many baby clothes, and SO many naked baby dolls in our home ;) Thanks! When I make some, do you mind if I link to my blog?
Sure, Melanie!
Send me a link when you've got them done -- I would love to see! :o)
i just came across this recently -- this is INGENIOUS!! i just made some for my daughter's doll. i know she will absolutely love it! thanks for sharing!!!
Thanks for sharing! I also sew doll clothes and i got lots of ideas here: www.missbcouture.com
go have a look, I like it very much
Thank you for the help! I did some clothes today and they turned out great!
Thanks! This is such a great idea! I made one pair of jammies today but my almost three year old told me her baby didn't want any new clothes. Ah well, maybe later!
Thank you so much for this great idea! My daughter loves her Corolle Tidoo doll (12 inches) but the only clothes I could find cost $20!!! Thanks to your tutorial I made her the cutest pink PJ's and now my little girl says that Sophie (her doll) needs more!
I love that I found this! This is exactly what I needed to find today. Thanks a bunch!
Thank you so much for this AWESOME tutorial! I was wracking my brain trying to figure out a way to use these old baby clothes from my dd to make her baby doll some clothes! Now I don't have to break the bank making her happy! THANKS!!
I can't wait to start sewing! My daughter is going to LOVE her new doll clothes.
this is the cutest idea ever!!! im goin to the second hand store and gettin some pjs for a buck! (since i got rid of all our baby clothes)
Thanks so much for this easy to follow tutorial. I have been looking for one to turn my granddaughters clothes she has out grown into clothes for her baby dolls.
you really deserve appriciation.very welldone
I used this to help me make some boy doll PJs. I linked back to you blog from mine. Thanks for sharing your tutorial!
What a great idea! My daughter is getting a Lalaloopsy doll for Xmas and I want to make her doll "special" pjs. Now I'm off to see if I still have some of her baby pjs...
Thank you for sharing this! I am making Cabbage Patch clothes for my little girl for Christmas and this is perfect! I will be linking to this as well. Please visit my brand new blog. It needs some love:)
http://mynewfavoritethingtoday.blogspot.com/
Love this idea. Can't wait to try it.
Thanks for this post. My girls have had great fun this week sewing up dolly clothes from baby clothes.
-Whimsy
Thanks for sharing this! I'm going to PIN it as soon as I finish this. I bought two 11-12" dolls at the thrift shop a couple weeks ago and haven't been able to find doll clothes at all. I and my 3 year old made "pillowcase" type dresses for them that turned out really cute. I'll post a tutorial here when I figure out how. LOL
I went to the consignment store today and picked up a couple of newborn onesies and plan on cutting those down and then I'll also use the scraps to make barbie clothes.
Thanks again! Tina
givingnsharing.blogspot.com
If you are here for best apparel featured product deals, apparel discounts, apparel coupons and much more with great savings. Just visit the site dealaboo.com for your best apparel deals & discounts.
OH how adorable! WIll have to do this soon! LOVE IT! Thanks for sharing!:)
OKay.....I couldnt wait to do this! I just took my daughters going home from the hospital outfit and made it to fit her American Girl doll! THANK YOU so much for posting! I cant wait to see the smile on my little girls face! :)
Thanks so much for sharing this. I'm a sewing novice and still managed to make a wonderful doll sleeper with this tutorial!
Thank you! I had been planning to donate my daughter’s baby clothes, but I think I am going to use this instead. After all, my daughter will enjoy having more doll’s clothes since they do get dirty much often, and they will be easy to clean.
Jerri Washam
What a great article about baby clothing.I really like your metaphors for friendship. Nice piece of writing indeed.Kids Clothes Ireland and Baby Clothes Ireland
What a great tutorial! Thanks for this blog! It's nice for making that doll your model. :)
baby trend double jogging stroller
baby trend snap n go
Great idea and tutorial on the baby doll clothes!!! I loved it so much I went and made a whole new wardrobe for my little girl's Cabbage Patch Dolls. :)I posted pictures of the dolls new clothes on my brand new blog - http://ribbonsbowsandwhoelseknows.blogspot.ca/ - and I linked to your blog entry, I hope that is alright!
I like your collection and designs are awesome.................
Babywear Wholesale
I like your collection and designs are awesome.................
Babywear Wholesale
Beautiful printed kurtis dresses !silks saree
Outstanding!!. I have a 1 year old baby girl and I just love to dress her up in cute baby clothes. I will try to make her these following the same technique but yes the bigger size of course. Haha...
Thanks to share this tutorial with us... Eyeones Kids
Are you sitting comfortably? At first glance buy Kids Jackets UK may seem unenchanting, however its study is a necessity for any one wishing to intellectually advance beyond their childhood. Remarkably buy Kids Jackets UK is heralded by shopkeepers and investment bankers alike, leading many to state that its influence on western cinema has not been given proper recognition. Often it is seen as both a help and a hinderence to the upper echelons of progressive service sector organisations, obviously.
Here I will show you a super simple way to make doll pajamas! ... eonesie.blogspot.com
wao it is to informative post such types of person that use online way of shopping. you have added nice collection of dresses. new born baby clothes
This blog was a really interesting read, information has been presented in a clear and concise manner. Thanks!
little girls dresses
party dresses for girls
Very informative and unique tips dear. Thanks for sharing.
Click here for more information's Wholesale Childrens Clothing in UK
What a fantastic and interesting blog about baby doll clothes tutorial. It's a nice idea that you can still use the unused baby clothes for the baby doll. Love it! Check out sweet little giggles if you are planning to purchase new baby clothes.
Would love to see some more tutorials showing how you made some of the other outfits pictured. I love this sleeper idea.
Would love to see some more tutorials showing how you made some of the other outfits pictured. I love this sleeper idea.
amazing clothes and looked so beautiful really
ArganOilhome
I've been following tutorials like this. Good thing about this tutorial is that you can reused old baby clothes. If you are planning to purchase a cool baby clothes online, I can suggest a site like nununu .
Ohhhhh !!!!!!!! Wow!!!!!!!
Your Design and all the collections are really amazing !
Thanks a lot for sharing this clothes!
Here are also some awesome collection!
Great Thanks!
Thank you soooo much for this tutorial! I am not experienced with sewing at all and I was so nervous but my little sleeper came out adorable!!!!
Get up to 80% off on all baby essentials including clothing, shoes, toys, diapers, furniture, strollers and prams from Babyoye Coupons| Babyoye Promo Deals
nice and top class service provider.
Prom Dresses 2016
post was useful for me and i think it would be also helpful for others.
free quote software
Zubaidas Online Provide Complete Range of Stroller & Buggies Buy Online in Karachi, Lahore, Islamabad All Across Pakistan
baby dress suits boy
Anyone who are looking for baby clothes online , this is the place where people can buy whatever they want buy for kids clothes, no matter that you are looking for single purchasing or as wholesale marketing, you can find here best collection of wholesale baby clothes and baby pajama, baby leggings on wholesale rate. excellent work guys,
Thanx For sharing This Post ..This is Really Helpful...
Buy Baby Clothes
Beautiful excellent amazing trails with lots of beautiful places.
kids wholesale clothing uk
I agree with your point of view of this article. This is a good article. Very timely given us so much useful information. Thank you!
Kids Clothing In India
Thank You for your Blog Information keep Updating. And visit here for Kids Fashion Online India
wonderful dolls' clothes
baby high chairs
casual shoes for women
Baby t shirts
baby bottom wear
newborn baby clothes
baby clothes online
espadrilles shoes for men
shirts for men
This post has great reference value, thank you very much for sharing, I would like bookmark it and read again well done. Buy Flower Girl Dresses
i think that gay marriage should be allowed in certain states but not in other states . their website
Toys are one of the best resources to make babies laugh. Soft Toys other playing items is specially made for small babies or kids. Sometimes toys make us remember our childhood memories.Check out the Best Baby Product Reviews. Thanks!
Great Blog!! That was amazing. Your thought processing is wonderful. The way you tell the thing is awesome.
Baby Girl Dresses Online
Much obliged for information. Natural Baby Care Products - Buy Newborn infant mind items and Baby Girl Clothes Malaysia at MamaEarth; Toxin Free MadeSafe confirmed brand in malaysia.
appreciate your idea very much.here you can visit us for information about baby walker
Appreciating the persistence you put into your website and detailed information you present. It's good to come across a blog every once in a while that isn't the same old rehashed information. Great read! I've bookmarked your site and I'm including your RSS feeds to my Google account.kids clothing online store australia
Hi fellas,
Thank you so much for this wonderful article really!
If someone want to read more about that newborn baby clothes I think this is the right place for you!
Hi fellas,
Thank you so much for this wonderful article really!
If someone want to read more about that newborn baby clothes I think this is the right place for you!
Hi Friends,
Purchase Baby Girl Clothes Malaysia with extensive variety of items for young men garments, young ladies apparel, infant garments.
I’m not sure where you are getting your information, but good topic. I needs to spend some time learning more or understanding more. Thanks for magnificent information I was looking for this info for my mission. children clothing australia
Phenomenal Blog! I should thank for the endeavors you have made in composing this post. I'm trusting the same best work from you down the road too.kids clothing online store australia
Hi, i read your blog occasionally and i own a similar one and i was just wondering if you get a lot of spam feedback? If so how do you reduce it, any plugin or anything you can recommend? I get so much lately it's driving me crazy so any support is very much appreciated. kids online clothing store australia
I have not got a sewing machine so do I just still follow the steps
If you want to buy cute baby sleepsuits for boys & girls online at best prices in Singapore, then visit Little Kooma.
If you looking best online deals baby clothes, Modern lifestyle offers best deals on baby stuff.
www.lampungservice.com
www.lampunginfo.com
lampungjasa.blogspot.com
beritalampungmedia.blogspot.com
lampungandroid.blogspot.comservislampung.blogspot.com
The original hair grow oil travels to the root of the hair and is absorbed properly, which stimulates extracts mixed with blood on the damaged root from the outside and provides all the nutrients from inside. With which our hair grows well and results quickly.
To visit our website click here=> http://moolhairgrow.info/
This is a really amazing post here, there is good information we also have the latest brand babies clothing website Just Too Cute In Birmingham Uk If You looking trusted website who Give You The Best Customer Services, Now The Season Have been changing so that we Have Almost 300+ Clothing designs and clothing Categories Like You Search Kids Wear Wholesale Online In Birmingham You Have To Check Just Too Cute babies want new quality Comfort and Design So That we Know, What, Babies Want Thanks For Clink On The Link
I like the idea about doll clothes.
Really appreciated
If you want more personalised or baby gifts?
Celebrate the arrival of your little one with best Personalized baby gifts. Collection of baby boy gifts, baby girl gifts,baby shower gifts, baby gift baskets & many more.
Send baby gifts online
This is a great website and I love this article. I am very inspired from your post. There’s a great deal is not to waste the old clothes of child but give it to her to spend a good time with it. Go for online shopping for kids at https://90shopping.co/
Know, How to Register Your Company in Section-8 act.
Reach to us
Such an informational post for best baby care at home. I am new a mom and I have a keen interest in sewing & stitching. This post boosted my confidence and gave me the insights that I was looking for. Thanks for sharing this tips, I know my baby girl gonna love it.
Reach Registrationwala website to know how to start garment business in india and how to register your business.
Shopping is my stress release activity. I love shopping. After becoming a parent now I'm a little bit careful about my expenses, now I don't shop free-hand as before. Shopping for babies is really a great challenge for first-time parents. Parents always considered to buy a cozy and comfy Kids Garments... Baba and New born Baby Dress online.
Thanks for the blog. Tips To Cure Diaper Rash
Oh my! What a wonderful resource this is.Thanks so much for sharing.
Ballerina Dress For Girl
Baby Sleeping Bag Blue
Very useful guideline on making baby clothes to doll clothes. Thanks for sharing. In case you're looking for wholesale baby clothes, just visit Kiskissing online shop.
I was very impressed by this post, this site has always been pleasant news Thank you very much for such an interesting post, and I meet them more often then I visited this site. Future Life is Good Jacket
Nice post and cute tutorial for dolls. Thanks for sharing and you can also check waste management recycling and waste management audit
Thanks for posting
my kid likes dolls.
Check this out too
Green Land Recycling LLC
شركة مكافحة حمام بالدمام
شركة تنظيف بالقطيف
Our the purpose is to share the reviews about the latest Jackets,Coats and Vests also shre the related Movies,Gaming, Casual,Faux Leather and Leather materials available AOT Cape
nice and informative
https://www.daybigen.com/
I have read your excellent post. This is a great job.T Birds Leather Jacket
Get reviews of best shopping sites from BestBuyPrice.com
Thanks for sharing this article Online ordering system
Thanks for sharing this article Car Repairs in Adelaide
Thanks for the posting this article Home Decor Australia I would like to share this
Thanks for sharing this post Kiln Dried Sand
Thanks for posting the great article Tree Removal Services
Thanks for sharing this interesting and amazing post with us, I really like this post. City Villian Hush Coat
I like this stylish Dakota Johnson Blue Coat dressing and I'm interested to purchase this dress for my wife on anniversary.
Organic mini crib sheets I think this is an informative post and it is very useful and knowledgeable. therefore, I would like to thank you for the efforts you have made in writing this article.
You have shared amazing post. This post is really helpful for us to know the information. Thank you for taking your time to post such a wonderful article.
Company registration in India
I am glad to be here and read your very interesting article, it was very informative and helpful information for me. keep it up. dean winchester leather jacket
Discountspk is a consumer-friendly service provider website which was initiated in June 2020 and since then our website has been facilitating the online consumer market and brand market."
hairstyles for school girls
Best and new hairstyles for school girl.
Thanks for sharing. New things learnt from the site . That's a great idea that you have shared.
Taxi in London |Premium Taxi |- Croydon.
Croydon taxi Provide The Best Offer For London Airport Transfer, All From London Airport Taxi Service. A Major Beneficial Ring now 02086864000, Visit Our Official Website:
http://www.croydoncar.co.uk/
Book your ride now online.Download the app SNUG RIDE on the mobile.
The fastest and safest ride to the airport in London.Clean and comfortable cars. Fully licensed taxi services. one of the most trusted taxi services in London. Meet & greet. special airport rates.
Book in under 60 seconds. Professional drivers.24 hours assistance. Our services include taxi transfers to Gatwick, Heathrow, London, Luton & Stansted airport. we are here to make you comfortable and hassle less for. Friendly and reliable taxi service at competitive prices. Our commitment to you is quality and long-lasting.
http://www.croydoncar.co.uk/
Book your ride now online. Download the app SNUG RIDE on the mobile.
Very nicely written article. Thank you for sharing this information. We have also Provided organic shampoo, organic Conditioner and skincare products.
Please visit us : https://buymiel.com/
Nice blog.thanks for sharing ur thoughts. Zoe Black Leather Biker Jacket Night Teeth
A Partnership is one of the main types of a business association. A partnership firm is the place where at least two people meet up to shape a business and gap the benefits in a concurred proportion. The partnership business incorporates any sort of exchange, occupation and calling. A partnership firm is not difficult to frame with less compliances when contrasted with organizations.
Nidhi consultancy helps in registration of many things such as partnership firm registration in delhi, new company registration in delhi etc. We help in many other things also msme registration in delhi, gst return filing in delhi and others. For our services you can contact us or please visit at our website.
Nidhi Consultancy
Nice Article, Thank you for sharing a wonderful blog post
Company registration in chennai
GST registration in chennai
Thanks for sharing such a informative blog with us thank you. Star Lord Game Jacket
Helpful post with detail steps. Thank you for your sharing. Check more wholesale baby clothing supplier in the US.
I got some different kind of knowledge from your webpage, and it is essential for everyone. Thanks for sharing it. cheap baby clothes wholesale
You have good articles here! If anyone here is looking for a loan @ 2% rate in return to buy a home or other financing needs, I want you to contact Mr Pedro On pedroloanss@gmail.com When I was introduced to Mr. Pedro at the market watch seminar, I was entering the market as a first time buyer. Naturally,my needs were a bit different and I had loads of questions. Before he sent me my pre-approval letter, he called to speak with me about what it meant and what could change. He made himself available to me at pretty much any hour via email and texts. He was very responsive and knowledgeable. He’s also very straightforward. I explained to him what my expectations were in terms of closing time and other particulars. He said he would meet those expectations but he surpassed them. I closed so quickly my realtor and the seller of course were excited about that. But as a buyer I appreciated being walked through the process of Mr Pedro loan offer. From pre-approval to closing- the journey was so seamless and I consider myself lucky because I’ve heard horror stories. I recommend him to anyone looking for a loan. Everything was handled electronically expediently and securely
Thanks for share
Mullet Hair Women
Yelena Belova VestI have joined your rss feed and sit up for in the hunt for more of your
great post. Also, I’ve shared your site in my social networks
lakers jacket with championship I’m more than happy to discover this website. I wanted to thank you for your time for this particularly wonderful read!!
I definitely loved every little bit of it and i also have you bookmarked to look at
new information in your site.
We should reliably focus in on prosperity first! To keep yourself freed from every one of the
worries while dealing with your kid, guarantee there is nothing inconsequential in the babocush rocker. For instance, pad, toys, or food things that can make your kid off-kilter while napping or can hurt in any way.
after reading this article, I realized this is unique and has lots of ideas. your article is so convincing that,s why I never stop myself to say something
Elementor pro coupon code about it.
For that reason each babocush swing fabric you purchase is never going to be an off-base decision, moreover, each plan has been thoroughly examined and made to ensure most extreme solace for your child. Additionally, these garments are stylish and jazzy. The current one passes on to one straightforward that it isn't just More or less the age, Men and ladies character, because of the reality most of adults might be spruce all over all over basically babocush swing.
I like your blog.thanks for sharing the post If interested you can see here something for kids.
babocush rocker
I never imagined and i would request, wright more blog and blog post like that for us. wright more blog and blog post like that for us. Thanks you once agian
birth certificate in gurgaon
Marriage registration in ghaziabad
Name change procedure in india
marriage registration in gurgaon
birth certificate in gurgaon
Name change ad in newspaper punjab.
Marriage registration in gurgaon
Marriage registration noida
Name add in birth certificate
Marriage registration in gurgaon
Marriage certificate in faridabad
Thank you for share this type of post
Quineaner Mia Provide the best products
I really enjoyed this site.Black Label Society Merch Vest
Roblox Hair Free Wow amazing hairstyles
thanks
Your porst is very helpful.I love doll and making clothes for them can be a practice. baby clothes are the same.
nice post .Tods n teens Provide largest variety of Baby/Kids Clothing and Hygiene Products.Buy online all over the pakistan
building stone Thank you very much for share this post
Wcoforever
amazing post
it is soooo cute. just like baby clothing.
your post is great I like your blog thanks for sharing charlie top gun bomber jacket
Thank you for share this type of post .leather jacket
Here available shirt in different colour Bespoke Brand
You will get premium quality Bespoke Tailor HK
Thanks for the great review. Great blog, very useful information. .. https://nullbrawl.net/
Shop this best quality Tetris 2023 Alexey Pajitnov Green Jacket For men SHOP NOW....
Thanks for sharing informative information keep sharing informative information. Star Trek Picard Field Jacket
https://midtaperfade.com/ WOw that's nice Post Thank you so much
This is such a thoughtful and creative way to repurpose those extra baby
clothes! It's great that the dolls can wear the same outfits the girls once did, adding a sentimental touch to their playtime. Plus, transforming clothes into something new ensures those memories are preserved and enjoyed for years to come.
Thank you for this wonderful tutorial! So helpful and creative for transforming baby clothes into adorable doll outfits. Really appreciate the tips!
Website url: https://www.shoplegal.in/fssai-registration-in-salem.php
The way you break down topics into manageable and actionable pieces is something I truly value. This article, in particular, provided practical steps that I feel confident will help me improve my approach and yield better outcomes.
USA Jacket Store
What a clever and creative way to repurpose baby clothes into adorable doll clothes! I love how practical and resourceful this idea is. As a member of the chuys coupona, I’m always on the lookout for deals on fabric and supplies to try out projects like this.
What a brilliant idea to repurpose baby clothes into doll clothes! I love how creative and resourceful this tutorial is. As a member of the speedy cash promotional codea, I’m always looking for budget-friendly ways to make new things, and this is such a fun and thrifty project.
Thank you for this creative and fun tutorial! Such a brilliant idea to repurpose baby clothes for doll outfits. Website url: https://www.shoplegal.in/
Wow ! Awesome post ! I've been working on saving up some outfits so I can do this .Maybe I'll have to go thru them to see if I have enough already! Great thanks !Happy good day!
cheap baby clothes
Thanks for the tutorial. Embroidery Digitising So nice.
Great tutorial! Loved the transformation from baby clothes to doll clothes. Very creative and useful!
Website url: https://www.solubilis.in/
Baby clothes to doll clothes tutorial is a fun and creative way to repurpose and design unique outfits. Similarly, the Best Disposable Vape Kit offers a simple and enjoyable experience, providing convenience and variety for those who appreciate quality. Just as creating clothes for babies and dolls allows for customization and personal touch, disposable vapes offer a range of flavors to suit individual preferences, making each break a personal and satisfying experience. Both the tutorial and the vape kit encourage creativity and a chance to unwind, adding joy to your daily life.
Great post! Our organization provides worldwide recruitment services. If you're looking for any type of consultancy, feel free to visit our website: company registration in UAE.
This version keeps it professional, concise, and engaging. Let me know if you'd like any modifications!
top recruitment agencies in dubai
I'm happy to be here and read your fascinating article! It was truly informative and provided valuable insights. Keep up the great work! Costume These Character Cosplay Jackets for Men
Cool
This article was exceptionally well-developed and clearly reflects a deep level of subject expertise combined with a thoughtful and deliberate approach to communication. What I found most compelling was how each idea was introduced with clarity, expanded upon with meaningful depth, and then carefully connected to the broader narrative. The structure didn’t just organize the content—it actively supported understanding by guiding the reader through a logical and progressive flow of ideas, making the entire piece feel cohesive, purposeful, and intellectually rewarding.
Kayifi
flame resistant coveralls deliver dependable protection and remain comfortable throughout demanding shifts.
Arc Flash Suit looks ideal for professionals who require trusted protection while carrying out inspections, maintenance, and critical electrical operations. Strong safety equipment can help support workplace confidence
Post a Comment