Friday, May 7, 2010

1st Quilt Ever -- Quilting Q&A Again!

More questions! :o)


No free-motion or darning foot!

A couple of you have said that there seems to be no hope of finding any kind of free-motion or darning foot for your machine. I have heard that it is possible to free-motion quilt with no foot at all -- although the thought makes me very nervous! How will you have any kind of precision without a foot to show you exactly where your needle will hit? And what about protecting your hands? And... really... DOES it work??

Being curious as I am (and not wanting to recommend doing something without trying it), I made this little video:


As you can see, there are some SERIOUS skipped stitches going on here.

Not being willing to give up, I gave it a couple more tries -- I tried going slower, I tried holding the quilt down a little closer to the needle (yikes!), I tried making even smaller stitches. Nothing I did prevented those skipped stitches from showing up.


Do you quilt over the border as well?

Yes! The meandering quilting "pattern" is great as an all-over quilting pattern. Go to town! Cover the whole quilt!


How do you stitch in one place for the backstitching?

Feed dogs down, baby! :o) You are the one controlling where the quilt moves, and therefore where the stitching goes!


Are you planning to do another quilt-along with one of the other Disappearing Nine-Patch quilts from this post?

I am planning to share how I made my I-Spy quilt (easy!), including fabric and cutting requirements, and block layout. The rest of it is going to be pretty much the same as the current quilt-along!


And, last but not least!
PANIC!! I don't think I'll be ready "later this month" for the 1st Quilt Ever Quilt Show!

No worries! I certainly can't have a quilt show with no quilts to show, now can I?
I may end up doing more than one "show!"

Thursday, May 6, 2010

1st Quilt Ever -- Quilting Questions & Answers

I figured there would be a few things I missed talking about, so here we go with some answers to your questions!


There were a lot of questions about which presser foot to use for free-motion quilting.

This is the one I use. I sew on a Bernina, and this is presser foot #9 -- known as "Darning Foot 9." If you would like more information on different presser foot options for free-motion quilting, I found this link to be extremely helpful.


What do you do with the safety pins as you are quilting?

For the most part, I am able to quilt around the safety pins without too much trouble. I've gotten pretty good at gauging how close I can get without sewing the pins. HOWEVER! That being said...

As I was quilting yesterday, in between shooting the little videos for my post, I got too close to a pin. I actually sewed straight through it and broke my needle!

Oops!
Obviously it is best to avoid sewing close to the pins. When you come up on a pin, remove it and continue quilting!


Is there a pattern you follow when you quilt? Rows? Columns? Sections?

I don't follow a particular pattern -- for me it is mostly random, working from one side to the other! If you do end up getting stuck (sewing yourself into a corner!) simply take a few stitches in one place where you want to stop (this is the "backstitch" for quilting), then start again where you need to.

If the idea of just jumping in and going random all over your quilt makes your brain scream "NO!", Brianne left a comment with a link to this excellent post about free-motion quilting using a more ordered, predictable method.


How do you deal with stopping and starting?

When you run out of bobbin thread, remove your quilt from the machine and reload your bobbin. Get your quilt back into your machine and locate the spot where you left off. Start on your same thread, a few stitches back from the end of the thread that stopped. Take a few stitches in place, then continue quilting on your way!


Why don't you cross over your own stitching line?

This is only for this particular quilting stitch -- meandering. Certainly there are other methods, but I recommend meandering as a GREAT place to start! :o)


GOOD LUCK, everyone! I can't wait to see how everyone's quilts turn out!

I'll be hosting a
1st Quilt Ever
Quilt Show
with photos of everyone's quilts sometime later this month!

1st Quilt Ever -- Quilting, Pt 2: THE REAL DEAL!

(If you missed Part 1 about practicing your quilting, you can find it here!)

So. QUILTING. It's a big subject!

Let's start with getting things set up.

I am going to assume that most of you do not have a sewing table your machine drops down into. Quilting is most definitely easier if you DO have one of these, but it is not the end of the world! Let's work around it!
I'm going to set up my machine and sewing area the way you will likely be setting up yours so you can see that it WILL work.


First of all, if your machine came with one of these:

This is one of the times you are going to be using it. Dust it off and attach it to your machine! It will extend your sewing area.


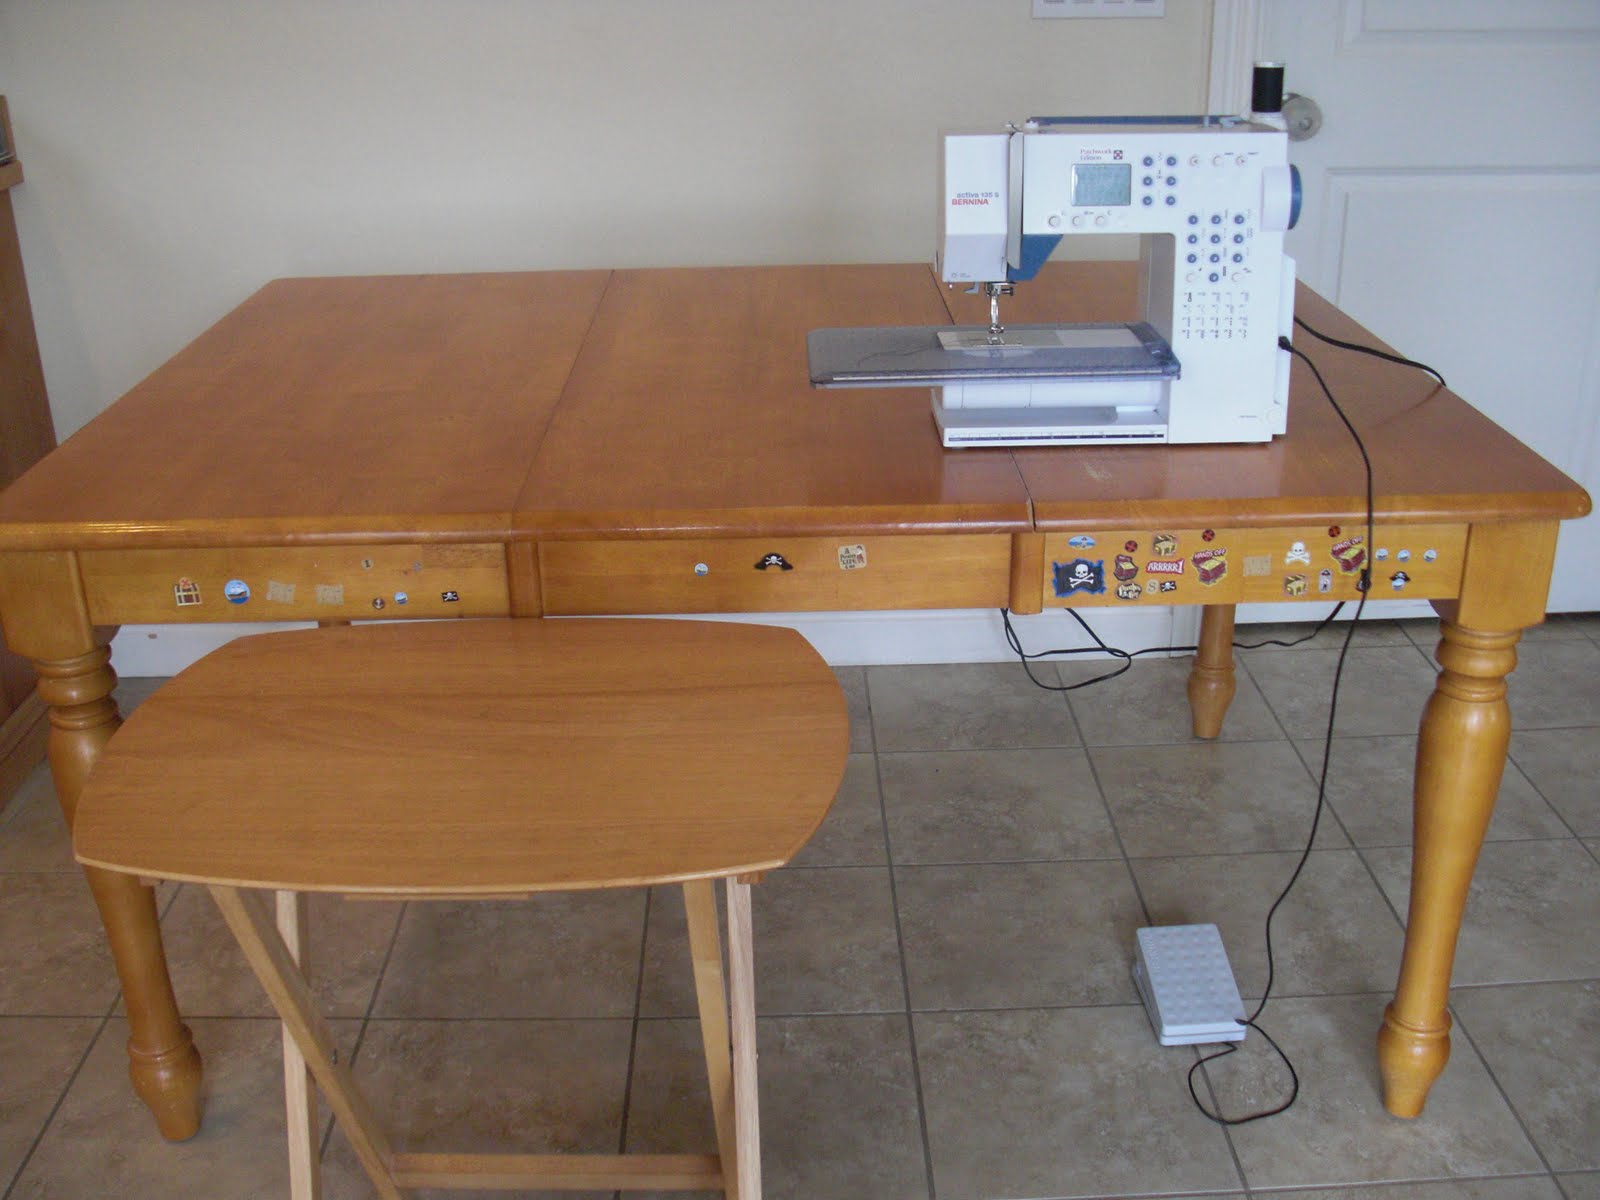
Next we're going to create even more surface area. Start with a large table. (I commandeered my kitchen table, complete with pirate stickers courtesy of my boys!) Place your machine at the front of the table, on the right hand side.

Next you will place a smaller table in front of your larger table, to the left of where you will be sitting. I am using a TV tray, but you could use a card table or any other table that is approximately the same height as your larger table. Mine is about 6" shorter -- no big deal.

If you have an office-type chair that raises up, this would be a good chair to use for quilting. You want to do your best to have your elbows the same height as your sewing machine's sewing surface. I fell a little short of this height, but it still worked fine.


Next comes thread selection (although I should have talked about this previously --sorry!). You want to pick a thread that matches the BACK of your quilt. I purchased both grey and yellow thread before I made a final decision on my quilt back. Obviously yellow ended up being the best choice. Why match to the back? The front of your quilt is scrappy, so you really could go with just about any thread color for the front of your quilt. But if, for example, I went with grey thread on the back of my quilt, my stitching would distract from the print. So, yellow it is!

As far as fiber content and/or brand of thread... Most serious sewists would probably recommend NOT using Coats & Clark thread SIMPLY for the fact that it is very linty and will quickly fill the moving parts inside your machine with fuzz. However, where I live it is not easy or convenient to find good color selection of other thread brands. I go with JoAnns' Coats & Clark thread, and it is fine for me. If you have concerns about thread fiber content/brand, do some research on the subject.

My thread came on 250-yard spools. You will most likely need two spools this size, or the equivalent.


Fill at least two bobbins with thread. (You will probably end up using at least four bobbins, but this is a good start.)


You are going to put a few miles (ha ha!) on your machine during the quilting process, so this is a good time to clean your machine.


Make it happy before we get started!


Replace your needle with a nice new one. I use a "universal" 80/12 needle for quilting.


Put on your free-motion foot, lower your feed dogs, and thread your machine.

You're ready!!


Here are a few short videos with some tips on being successful in quilting:
P.S. I am not in love with how goofy I sound on video -- please don't mock me! :o)


Starting Out -- Place the bulk of your quilt behind your machine on the table and bring one corner forward and under the machine, as shown.


Getting Your Quilt Through the Machine


Quilting in the Center


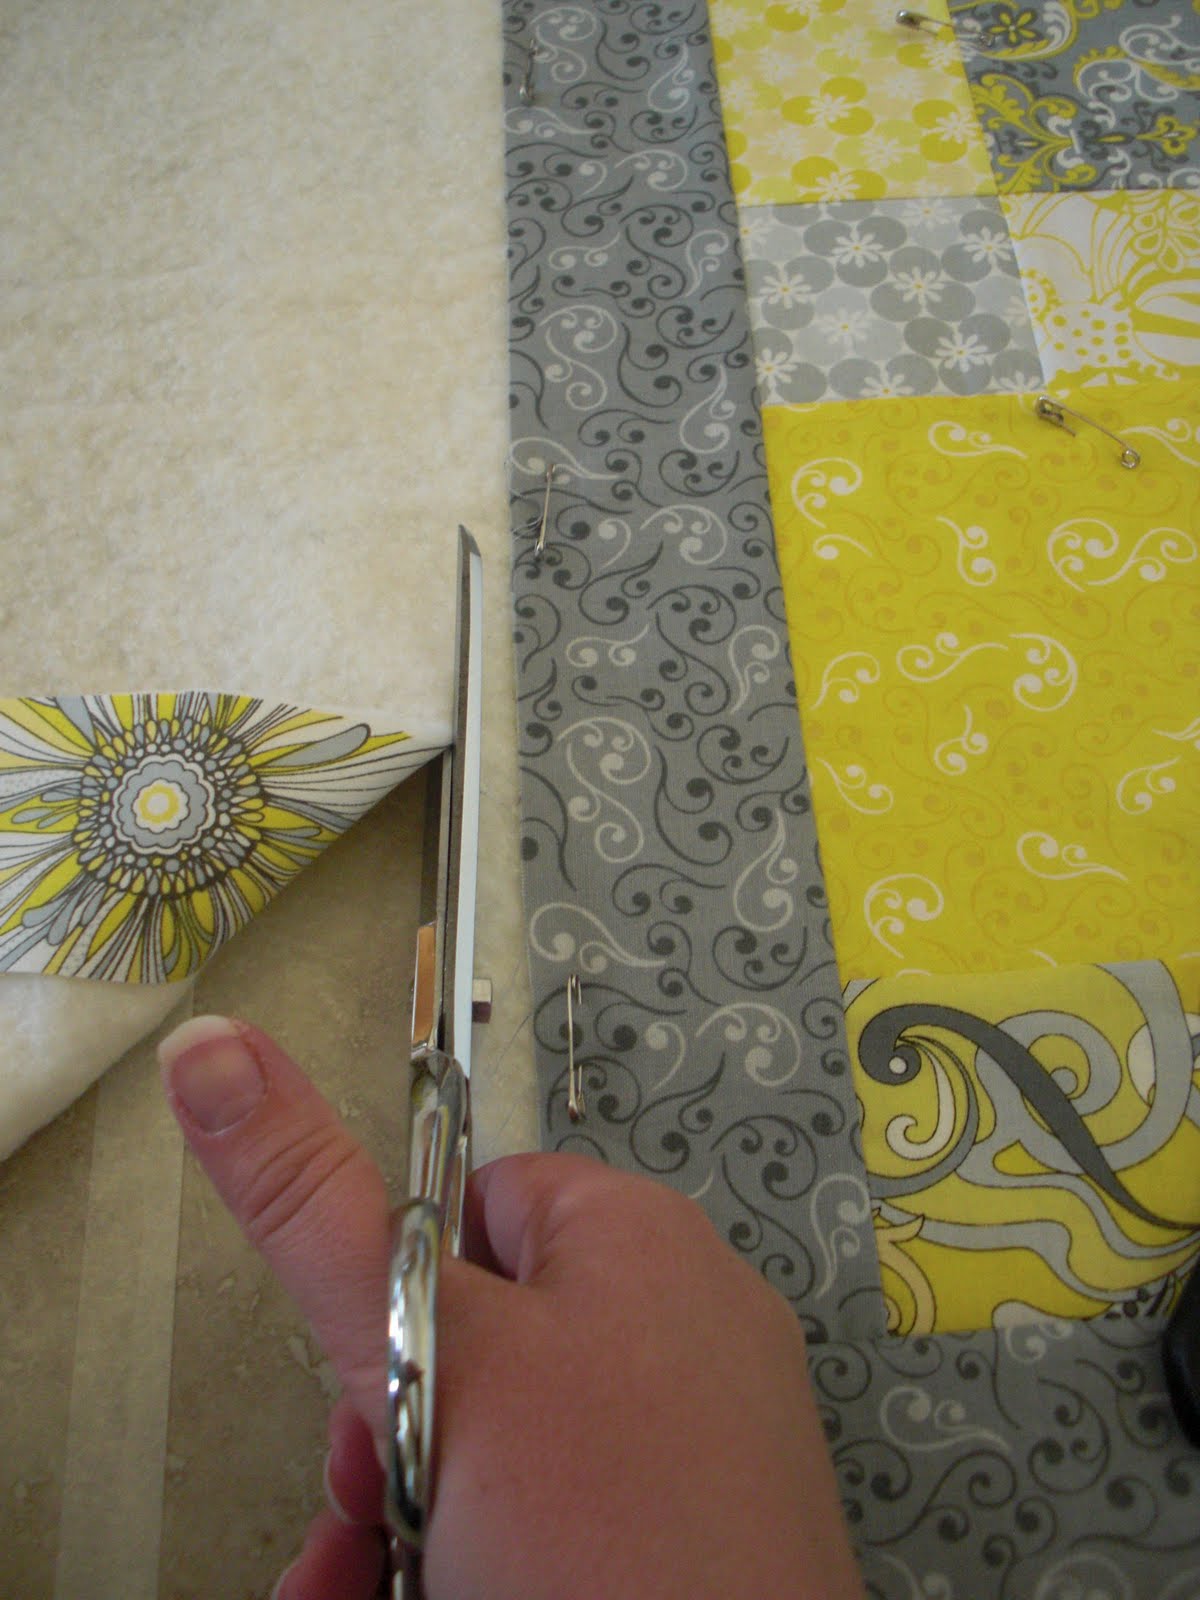
Here is an example of why you wanted a little extra room around the edges of your quilt. I've got a little "bubble" of fabric being pushed toward the edge.


All you have to do is remove that safety pin and spread the quilt top flat.


Whenever I run out of bobbin or have to stop quilting for any reason, I bust out a safety pin with a piece of brightly-colored yarn or ribbon tied in the loop and pin it where I stopped stitching. This makes it easy to pick up where I left off!


Okay, anyone have questions? Leave a comment!


I will leave you with this long and probably boring video of me quilting away!

HAPPY QUILTING!

Wednesday, May 5, 2010

1st Quilt Ever -- Quilting, Pt 1: PRACTICE

Show of hands, who's scared?

Don't be! Let's practice!

If you have a scrap of batting, pin baste it between two pieces of fabric to create a little practice piece. Or, bust out an old dish towel or bath towel to practice on. You just need something with a little thickness to it to do a practice run!


You always start free-motion quilting the same way: Start with two or three stitches in place (this is the quilting version of backstitching), then start your design.

Here are a couple super short videos of stitches you can practice.


For this one you can start with a shape you've drawn directly onto your fabric using a disappearing ink marker. If you are using a design that has corners, pause slightly at each angle to ensure a sharp point.


This meandering stitch is the quilting method I use most. There is no need to mark anything. The only guidelines are:
A) Try and keep your stitching lines a consistent distance apart. My distance was approximately 1 1/2" in this example.
B) Try not to cross your own stitching lines.
Other than that, you can go to town with this design!


If you are too nervous to freehand a design, or your fabrics are too dark or scrappy to draw your design on, you can create a paper template and simply sew around it.

In this little video my paper template popped over the top of my free-motion foot. All you have to do is stop sewing, lift the foot, and stick the paper back underneath it. I also accidentally sewed over the edge of my paper. No big deal! Just tear the paper away!


WHAT YOU WANT TO PRACTICE:

~ Remember that YOU are controlling the stitch length! Practice coordinating your foot pedal speed with your hand speed to get a consistent stitch length.

~ Practice the design you want to do on your actual quilt.


You can do this!! Try it out and see how it feels!
I have LOTS more to share -- stay tuned!

Tuesday, May 4, 2010

1st Quilt Ever -- Basting!

Gather together some supplies! It's time to get your quilt ready to be quilted!

Here's what you need:

~ your quilt top, freshly pressed
~ your quilt back, freshly pressed
~ batting
~ masking tape or packing tape
~ safety pins
~ a spoon (yes, really!)

You also need an area on a hard floor large enough for your quilt to be spread out on, with an additional foot or so around each side for you to maneuver in. If you have tile or linoleum, or even a concrete floor in your basement, YAY! If you have hardwood floors, NOT YAY! I wouldn't recommend basting your quilt on your hardwood floor -- the tape and/or the pins could hurt it. Borrow someone else's floor for this step!

Before you start: If you are starting with a brand new package of safety pins, you will notice that they come CLOSED. This will annoy you when you finally get down on the floor to pin-baste your quilt! Take a little time to sit in front of your favorite television show (or blog!) and open them all. And store them OPEN from here on out! :o)


Start by taping your quilt back to the floor, right side DOWN.
First you will tape the two short sides, lining up the edges with lines on your floor, if you have them. Pull the fabric taut as you go -- you don't want any ease in your quilt back!


I line up my quilt back so that one corner is lined up on my tile's grout lines.

Next you will tape the two long sides, pulling them taut, out from the center.

YES, you want to use long, continuous strips of tape the WHOLE WAY AROUND. Don't skimp on the tape, folks!! You don't want your quilt back to be bunchy!!


Next you will gently layer your batting on top of your quilt back. Continue working from the same corner -- I am starting at the corner I lined up square on my tile lines. Carefully and gently spread the batting over the quilt back. Avoid actually climbing on top of the taped back -- this could pop your tape.


As you spread your batting you might end up with these weird, unavoidable little creasy-bumps in your batting. Gently pat them down and get them to lay flat.


Ta-Da! Batting spread! (Obviously I used a batting larger than crib size -- yours should be fitting much more nicely than mine!)


Gently layer your quilt top on top of the batting, again starting from the same corner, but in a little from the edge. You want about 1/2" of batting and backing to be peeking out from under the edge of your quilt top.


Carefully smooth your quilt top over the batting until it is flat.

You're ready to pin!


I start by dumping out a little pile of pins on my quilt. They're easier to grab without stabbing yourself if they are laid flat rather than in a container!


Start pinning from that same corner! I like to pin right along the edges. I usually place pins around 5" apart in a grid pattern all over the quilt.


You will pin in "rows" -- put in five or six pins along this edge, moving away from the corner as you go. Then start on the front edge again and put in more pins, starting at the front edge and moving away from yourself. (My photo shows a side view of this process.)


Spread out your quilt ahead of you as you pin, away from that starting corner -- you WILL end up with some ease as you go, as shown in this photo. You are spreading the quilt top flat as you pin to avoid any tucks or bubbles come quilting time!


Here's a little tip! Remember that spoon? It is going to save your poor little fingers during pinning! With your right hand (if you are right-handed!), poke your pin down until you feel the floor, then back up and through the quilt. With the spoon in your left hand, place the right edge of the spoon under the point of your pin. Tilt the right edge of the spoon up to close the pin, and use your right hand to guide the pin into the -- what do you call it?? -- SAFETY part of the pin! Make sense? Try it! Practice! It will save your poor left-hand fingers from wearing out! :o)


A little think-ahead moment!! If you are planning to do straight-line quilting along the seam lines of your quilt, you do not want to place pins on those seams. You will be seriously annoyed if you have to remove a pin every 5" as you sew! :o)

However, if you plan to free-motion quilt, it doesn't matter where those pins lie. Just go for it!


Do your best to avoid climbing on top of your quilt. There comes a point when you just have to -- but try to sit only on the part that has already been pinned.


When you've got it all pinned and it comes time to trim those edges, you may be tempted to cut right along the edges of your quilt top. DON'T DO IT!! :o) Give yourself at least 1/2" all the way around your quilt. There are two reasons for this: #1 As you quilt it is very likely that your top will stretch even more -- especially with straight-line quilting, if that's what you are planning. By leaving that extra 1/2" or so, you are giving your quilt top a little "wiggle room." You don't want your top to end up longer over the edges of your back! #2: We are doing a fairly fatty binding. You want something to fill that binding! If you trim your batting and back too close to the edge, your binding will end up flat and empty... and sad! Give yourself a little room! :o)


DONE! Pinned! Ready to be quilted!! Find somewhere to place your quilt where it won't get folded up or mashed -- over your ironing board or stair railing (that's where mine is!) or guest bed or... somewhere flat! :o) And gear yourself up to talk quilting TOMORROW! :o)

Boys' Wallet from Dish Towel!

My son got his very own library card last week... hooray! He was so excited! We were talking about his card and how he would need to keep it safe, and I wondered aloud where he would keep it. His answer was -- "In my wallet!" Of course! So we had to whip one up for him!


I've had this FABULOUS dish towel for months and months, just waiting to be turned into something amazing. After a little measuring I discovered that one fish would be exactly the right size to fit perfectly on a wallet!

Here's what you'll need to make yours:

~ dish towel
~ scrap of velcro
~ fusible interfacing


STEP ONE: Cut your pieces. Here's what you'll need:

8 1/2" x 3 1/2" rectangle for outside of wallet
8 1/2" x 3 1/2" rectangle for bill pocket lining
8 1/2" x 6" rectangle for lining
8 1/2" x 4 1/2" rectangle for card pocket
8 1/2" x 3 1/2" rectangle heavy-ish fusible interfacing
1 3/4" x 1/2" piece of velcro (both sides)

STEP TWO: Fuse the interfacing to the wrong side of your wallet cover piece.


STEP THREE: Fold your lining piece and card pocket piece in half (the long way, as shown) and press.


STEP FOUR: With your card pocket piece folded, center your velcro on the two sides, 3/8" in from the outer and lower edges, and sew in place.


STEP FIVE: Layer your card pocket piece on top of your lining piece, both still folded, and sew vertically on the center line. This will create two card pockets.


STEP SIX: Layer the folded pieces on top of your bill pocket lining (everything right side UP), and baste around the edges of the pockets.


STEP SEVEN: Layer this entire piece on top of your interfaced wallet cover piece, right sides together.


STEP EIGHT: Sew around the edges using a 1/4" seam allowance, leaving a 3" opening at the bottom for turning.


STEP NINE: Trim corners for easier turning, as shown.


STEP TEN: Turn right side out, paying special attention to the corners, and press. Topstitch around the edges of your wallet, also closing the opening.


Ta-Da!


Complete with velcro closure, two card pockets, and a bill pocket!