
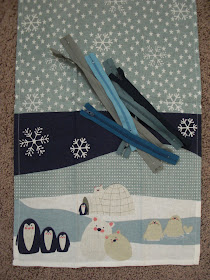
I don't always have a particular project in mind when I head to the dollar store. I don't necessarily even have a project idea when I find materials! A couple weeks ago I found a dishtowel with the CUTEST little pictures on it. I had no idea exactly what I would be using it for, but I knew I would think of something -- so I bought it!
Well, this week my idea emerged: Little coin purse keychains!
Perfect for stocking stuffers...
 ...if I can bear to part with any of them!! :o)
 What you'll need:
~ cute dish towel (or placemat!)
~ zipper(s)
~ key rings (optional)
(I found my key rings on the craft aisle at the dollar store -- 12 for a buck!!)
 STEP ONE: One of the cute motifs I liked was awfully close to the edge of my dishtowel, so I picked the edge stitching open and pressed out the folds with my iron.
 STEP TWO: Cut a front and back for your coin purse. You can make these any size -- just make it fit around your motif with enough room on the edges for 1/4" to 3/8" seam allowance.
 STEP THREE: (Note: I'm switching coin purses from here on out!) Using your iron, press the top edge of your front and back pieces down (towards the back) twice. This will tuck away that raw edge and keep it free from your zipper.
 STEP FOUR: Open your zipper and attach the front and back pieces to it. Line them up carefully to each other! Be sure to leave enough space between the teeth of the zipper and the edge of the fabric so that the zipper tab will pull freely without catching the fabric.
 STEP FIVE: Zip your zipper shut and sew a wide zigzag at stitch length zero to create a zipper stop. You don't want to be zipping your zipper tab right off the end!
 STEP SIX: Leave your zipper about 2/3 of the way open and sew around the three raw edges of your coin purse, using no less than a 1/4" seam allowance.
 STEP SEVEN: Cut off the excess zipper, leaving the same seam allowance as the rest of your coin purse. (DON'T use your good sewing scissors!!)
 STEP EIGHT: Sew a zigzag stitch around all the same edges, allowing the needle to stitch off the edge of the fabric on the right. This will help prevent most fraying.
 STEP NINE: Carefully turn your coin purse right side out.
 Isn't it CUTE??!?
 STEP TEN: Make a million more of them and add key rings!
 They're even cute on the back!!
Well, this week my idea emerged:
Little coin purse keychains!Perfect for stocking stuffers...
 ...if I can bear to part with any of them!! :o)
 What you'll need:
~ cute dish towel (or placemat!)
~ zipper(s)
~ key rings (optional)
(I found my key rings on the craft aisle at the dollar store -- 12 for a buck!!)
 STEP ONE: One of the cute motifs I liked was awfully close to the edge of my dishtowel, so I picked the edge stitching open and pressed out the folds with my iron.
 STEP TWO: Cut a front and back for your coin purse. You can make these any size -- just make it fit around your motif with enough room on the edges for 1/4" to 3/8" seam allowance.
 STEP THREE: (Note: I'm switching coin purses from here on out!) Using your iron, press the top edge of your front and back pieces down (towards the back) twice. This will tuck away that raw edge and keep it free from your zipper.
 STEP FOUR: Open your zipper and attach the front and back pieces to it. Line them up carefully to each other! Be sure to leave enough space between the teeth of the zipper and the edge of the fabric so that the zipper tab will pull freely without catching the fabric.
 STEP FIVE: Zip your zipper shut and sew a wide zigzag at stitch length zero to create a zipper stop. You don't want to be zipping your zipper tab right off the end!
 STEP SIX: Leave your zipper about 2/3 of the way open and sew around the three raw edges of your coin purse, using no less than a 1/4" seam allowance. STEP SEVEN: Cut off the excess zipper, leaving the same seam allowance as the rest of your coin purse. (DON'T use your good sewing scissors!!)
 STEP EIGHT: Sew a zigzag stitch around all the same edges, allowing the needle to stitch off the edge of the fabric on the right. This will help prevent most fraying.
 STEP NINE: Carefully turn your coin purse right side out.
 Isn't it CUTE??!?
 STEP TEN: Make a million more of them and add key rings!
 They're even cute on the back!!
What a fantastic tutorial and a great project! Those dishtowels are so adorable, but *way* cuter as coin purses. Bravo!
ReplyDeleteHow cute!! Great little gifts for kids too!
ReplyDeleteVery cute. I visited our local "Dollar Tree". They don't have towels that cute.
ReplyDeletethese are adorable...what a wonderful tutorial
ReplyDeleteThose are SO cute! Thank you for the tutorial!
ReplyDeleteThanks! It looks like a great way to use up some of my scraps too!
ReplyDeleteI'll take one of those if you're looking for someone to give them to! ;) I don't sew and this makes me want to learn! SO cute!
ReplyDeleteVery cool! You make me want to visit a dollar store. Now. Too bad my kids are home on a snow day. :-)
ReplyDeleteThese are awesome! What a great, last-minute gift idea.
ReplyDeletecute little purse...thank you for sharing the tutorial
ReplyDeleteI have been holding on to the same dish towels and had just this morning given up and hung them on the stove. Going to get them down and do some sewing. Great job!
ReplyDeleteFabulous!!! Your creativity once again has me picking my jaw up off of the floor.
ReplyDeleteI featured your tutorial on Craft Gossip Sewing:
http://sewing.craftgossip.com/tutorial-zippered-coin-purses-from-dish-towels/2009/12/15/
--Anne
I featured this on my blog (it's on the sidebar):
ReplyDeletehttp://treasuresfortots.blogspot.com/
Very nice and clear tutorial. I'm hopeless at sewing and zippers scare me! Your tutorial gives me some hope that I may be able to make a coin purse yet. Thanks!
ReplyDeleteYou clever thing you!!! I love these! I didn't know you could cut a zipper down to size......thanks! Now I have to try to make one!
ReplyDeleteLove this idea - thanks for the tutorial x Shell
ReplyDeleteWow, I did see some great dish towels at Dollar Tree, now I'll have to go buy some to do this.
ReplyDeleteThese are just adorable! And there is still time to make a few for stocking stuffers. Thanks for an easy to follow tute. I'll be linking on FaceBook.
ReplyDeleteis it possible to use fabric glue?? my sewing machine is down :(
ReplyDeleteI love these! So sweet, what a neat idea!
ReplyDeleteLOVE these! I made zipper bags a while ago and these inspire me to make some more!
ReplyDeleteCheers!
Pink Velvet Bird
so cute! great tutorial
ReplyDeleteWay cute! Love the idea of repurposing the tea towels, but the tutorial is great for any fabric. I'm thinking oilcloth ;)
ReplyDeleteSuch a cute fabric, and a great idea! I wish we had dollar stores in Norway too.. :)
ReplyDeleteveryyy gooooddd
ReplyDeleteadorable!
ReplyDeleteWhat a clever idea, I am making Advent gifts for all my kids and this is going to be one. Even the guys will like these for their cars, to put their loose change in!
ReplyDeleteThe cute factor is high...
ReplyDeleteUber cute!
ReplyDeleteThose are great: I'll definitely do some form my friends! Great to use scraps :)
ReplyDeleteOh my gosh...PERFECT to keep my gym membership card with my keys while I work out!
ReplyDeleteOh how cute!!!! You never cease to amaze me!!!
ReplyDeleteJ'aime beaucoup ces petites pochettes. C'est une bonne idée d'utiliser un torchon pour trouver un tissu intéressant. Merci
ReplyDeleteWhat a great idea! This would be great to use up old blue jeans too! Thanks for sharing!
ReplyDeleteGreat tutorial! I am going to add your blog to my blog!
ReplyDeletewhat great ideas as stocking stuffers too
ReplyDeletewhat a great imagination you have
thanks for sharing
Amazing.. this was really helpful and easy to learn. Best Organizer Wallet is an incredible pick for you.
ReplyDeletesleeves digitizing
ReplyDeletehttps://crystaldigitizing.com/custom-embroidery-digitizing